


Network Scanning
203
11
d Press a or b to choose 1sided, 2sided (L)edge or 2sided (S)edge. Press OK.
Note
If you want to scan a document using the duplex scanning feature, you need to put the document in the
ADF and then choose 2sided (L)edge or 2sided (S)edge depending on your document layout.
e Press a or b to choose the destination Macintosh
®
you want to send to.
Press OK.
If the LCD prompts you to enter a Pin number, enter the 4-digit Pin number for the destination
Macintosh
®
on the control panel.
Press OK.
f Press Mono Start or Color Start.
The machine starts the scanning process.
Note
Scan type depends on the settings on the Device Button tab, Mono Start or Color Start do not change
the settings.
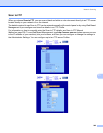
Scan to File 11
When you choose Scan to File, you can scan a black and white or color document and send it directly to a
Macintosh
®
you designate on your network. The file will be saved in the folder and file format that you have
configured in ControlCenter2 on the designated Macintosh
®
. You can change the Scan configuration. (See
File on page 186.)
a Put the document face up in the ADF, or face down on the scanner glass.
b Press (Scan).
c Press a or b to choose Scan to File.
Press OK.
If your machine is an MFC-9440CN, MFC-9450CDN, DCP-9040CN or DCP-9042CDN, go to Step e.
If your machine is an MFC-9840CDW, go to Step d.
d Press a or b to choose 1sided, 2sided (L)edge or 2sided (S)edge. Press OK.
Note
If you want to scan a document using the duplex scanning feature, you need to put the document in the
ADF and then choose 2sided (L)edge or 2sided (S)edge depending on your document layout.
e Press a or b to choose the destination Macintosh
®
you want to send to.
Press OK.
If the LCD prompts you to enter a Pin number, enter the 4-digit Pin number for the destination
Macintosh
®
on the control panel.
Press OK.