


1-8
Cisco Physical Access Gateway User Guide
OL-20932-02
Chapter 1 Overview
Installation and Configuration Summary
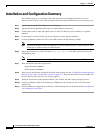
Installation and Configuration Summary
The following steps are an example of the main installation and configuration tasks for a Cisco
Physical Access Control system. The exact procedure and order of installation for your system may vary.
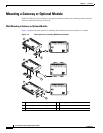
Step 1 Unpack and mount the Cisco Physical Access Gateway.
Step 2 Unpack and mount optional reader, input or output modules, if necessary.
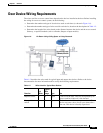
Step 3 Connect door readers, input and output devices to the Cisco Physical Access Gateway or optional
modules.
Step 4 Connect power to the Cisco Physical Access Gateway and any optional modules.
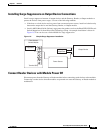
Step 5 Connect an Ethernet cable from a PC to the ETH1 interface on the Gateway module.
Note To enter the Gateway initial configuration, be sure to connect your PC to the ETH1 port. The
ETH0 port is used for network communication.
Step 6 Open a web browser on your PC and enter https://192.168.1.42. This URL opens the web-based
configuration page.
Note Be sure to include the s in https://. This connects your browser to the secure URL.
Step 7 Enter the default username and password:
default username:
gwadmin
default password: gwadmin
Step 8 Enter and save the Network settings in the Initial Setup window. See the “Configuring and Managing the
Gateway Using a Direct Connection” section on page 2-15. Wait until the Gateway resets and the web
browser displays the screen Network Settings Applied.
Step 9 Verify the connections to the optional modules, door readers and other input and output devices.
Step 10 Connect an Ethernet cable from the Gateway ETH0 port to the IP network, and verify IP network
connectivity.
Step 11 Perform additional configuration, verification, and monitoring tasks as described in the Cisco Physical
Access Manager User Guide.