


Adding Parts 85
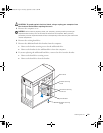
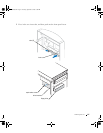
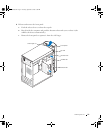
12 Reinstall the existing hard drive into the computer in front of the additional drive.
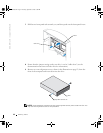
CAUTION: Match the colored strip on the cable with pin 1 on the drive (pin 1 is
marked as "1").
13
Connect the power and data cables to the back of the drives.
14 Replace the computer cover.
NOTICE: To connect a network cable, first plug the cable into the network wall jack and then
plug it into the computer.
15
Connect your computer and devices to electrical outlets, and turn them on.
See the documentation that came with the drive for instructions on installing any
software required for drive operation.
Adding a Floppy Drive
CAUTION: Before you begin any of the procedures in this section, follow the
safety instructions on page 9.
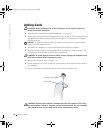
1
Shut down the computer through the Start menu (see page 27).
2 Ensure that your computer and attached devices are turned off. If your computer and
attached devices did not automatically turn off when you shut down your computer,
turn them off now.
NOTICE: To disconnect a network cable, first unplug the cable from your computer and then
unplug it from the network wall jack.
3
Disconnect any telephone or telecommunication lines from the computer.
4 Disconnect your computer and all attached devices from their electrical outlets, and
then press the power button to ground the system board.
CAUTION: To guard against electrical shock, always unplug your computer from
the electrical outlet before opening the cover.
5
Remove the computer cover (see page 74).
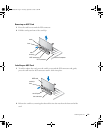
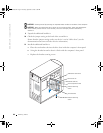
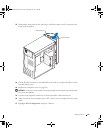
6 Release and remove the front panel:
a Push the release lever to release the top tab.
b Reach inside the computer and push the bottom tab towards you to release it (the
middle tab releases automatically).
J2936bk0.book Page 85 Tuesday, September 2, 2003 3:06 PM