


102 Installing System Components
3
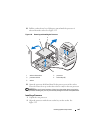
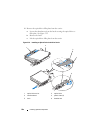
If you are adding a processor to an empty socket, perform the following
steps:
a
Remove the protective cover from the processor socket.
b
Pull the socket-release lever 90 degrees upward. See Figure 3-21.
c
Lift the processor shield. See Figure 3-21.
4
I
nstall the processor in the socket.
NOTICE: Positioning the processor incorrectly can permanently damage the
system board or the processor when you turn the system on.
a
If the release lever on the processor socket is not fully open, move it to
that position.
b With the
p
rocessor and
the
socket
keys
aligned, set the processor
lightly in the socket.
NOTICE: Do not use force to seat the processor. When the processor is positioned
correctly, it fits easily into the socket.
c
Close the processor shield. See Figure 3-21.
d
R
otate the socket release lever back down until it snaps into place,
securing the processor.
See Figure 3-21.
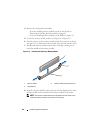
5
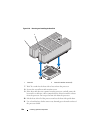
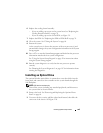
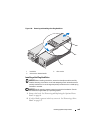
Install the heat sink.
NOTE: If you did not receive a replacement heat sink, use the heat sink that
you removed in step 10.
a
If you receive a heat sink and pre-applied thermal grease with your
processor kit, remove the protective sheet from the thermal grease
layer on top of the heat sink. See Figure 3-20.
If you did not receive a replacement heat sink with your processor kit,
apply new thermal grease:
• Using a clean lint-free cloth, remove the existing thermal grease
from the heat sink.
• Open the grease packet included with your processor kit and apply
thermal grease evenly to the top of the processor.
b Place the heat sink onto the processor. See
Figure 3-20
.
c While pressing down on the heat, secure the heat sink by tightening
the two retention screws until resistance is felt. See
Figure 3-20
.