


Installing System Components 129
c
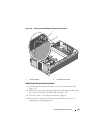
Lift the board out of the system, being careful to avoid damaging
components on the face of the board.
d
Place the interposer board aside on a work surface.
Replacing a Peripheral Interposer Board
1
Install the peripheral interposer board:
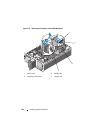
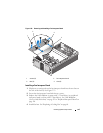
a
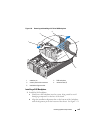
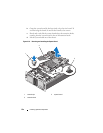
Carefully lower the interposer board into the system, being careful to
avoid damaging components on the face of the board. See Figure 3-32.
b
Align the installation alignment slot on the bottom of the interposer
board with the alignment pin on the bottom of the chassis.
c
Slide the retention slots on the interposer board over the retention
hooks on the chassis.
d
Slide the board downward until the blue retention tab snaps into
place.
2
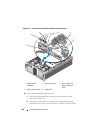
Connect the SATA, planar interface, and control panel cables to the back
of the interposer board. See Figure 3-32.
3
Connect the power cable to the top of the interposer board.
4
Reconnect the SAS and backplane power cables to the back of the SAS
backplane. See Figure 3-30 or Figure 3-31.
5
Replace the cooling shroud assembly. See "Replacing the Cooling Shroud
Assembly" on page 70.
6
Replace the PEM. See "Replacing the PEM or PEM Shell" on page 76.
7
Close the system. See "Closing the System" on page 66.
8
Reconnect the system to its electrical outlet and turn the system on,
including any attached peripherals.