


126 Installing System Components
c
Slide the retention slots on the backplane over the retention hooks on
the chassis.
d
Slide the backplane downward until the blue retention pin snaps into
place.
2
Connect the SAS, interface, and power cables to the SAS backplane.
3
Connect the control-panel cable to the front of the SAS backplane.
4
Install the SAS hard drives in their original locations. See "Hard Drives" on
page 105.
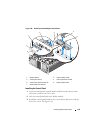
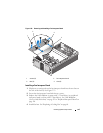
5
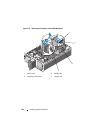
Install the optical drive carrier.
Slide the drive carrier into its drive bay and press in the release latch. See
Figure 3-20
.
6
Replace the cooling shroud assembly. See "Replacing the Cooling Shroud
Assembly" on page 70.
7
Replace the PEM. See "Replacing the PEM or PEM Shell" on page 76.
8
Close the system. See "Closing the System" on page 66.
9
Reconnect the system to its electrical outlet and turn the system on,
including any attached peripherals.
Peripheral Interposer Board
Removing a Peripheral Interposer Board
CAUTION: Any installation that requires removal of the system cover is intended
solely to be performed by trained service technicians. See your Product
Information Guide for complete information about safety precautions, working
inside the computer, and protecting against electrostatic discharge.
1
Turn off the system and attached peripherals, and disconnect the system
from the electrical outlet.
2
Open the system. See "Opening the System" on page 65.
3
Remove the PEM. See "Removing the PEM or PEM Shell" on page 73.
4
Remove the cooling shroud assembly. See "Removing the Cooling Shroud
Assembly" on page 69.
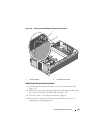
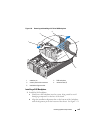
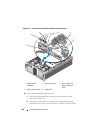
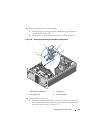
5
Disconnect the SAS data and backplane power cables from the back of the
SAS backplane. See Figure 3-30 or Figure 3-31.