


98 Installing System Components
CAUTION: The memory modules are hot to the touch for some time after the
system has been powered down. Allow time for the memory modules to cool
before handling them. Handle the memory modules by the card edges and avoid
touching the components on the memory module.
1
Turn off the system, including any attached peripherals, and disconnect
the system from the electrical outlet.
2
Open the system. See "Opening the System" on page 65.
3
Remove the PEM. See "Removing the PEM or PEM Shell" on page 73.
4
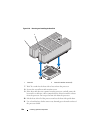
Remove the cooling shroud assembly:
– If you are removing memory modules on the system board, see
"Removing the Cooling Shroud Assembly" on page 69.
– If you are removing memory modules on the PEM, see Figure 3-9.
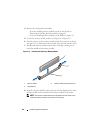
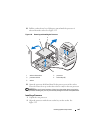
5
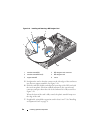
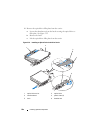
Locate the memory module sockets. See Figure 6-1.
6
Press down and out on the ejectors on each end of the socket until the
memory module pops out of the socket. See Figure 3-19.
Handle each memory module only on either card edge, ensuring not to
touch the middle of the memory module.
7
Replace the cooling shroud assembly:
– If you are removing memory modules on the system board, see
"Replacing the Cooling Shroud Assembly" on page 70.
– If you are removing memory modules on the PEM, see Figure 3-9.
8
Replace the PEM. See "Replacing the PEM or PEM Shell" on page 76.
9
Close the system. See "Closing the System" on page 66.
Processors
Your system supports either two or four processors. You can upgrade
processors to take advantage of future options in speed and functionality.
Each processor and its associated internal cache memory are contained in a
land grid array (LGA) package that is installed in a socket on the system board
or processor expansion module.
NOTICE: All processors must have the same frequency and core voltage.