


Installing System Components 99
Removing a Processor
CAUTION: Only trained service technicians are authorized to remove the system
cover and access any of the components inside the system. See your Product
Information Guide for complete information about safety precautions, working
inside the computer, and protecting against electrostatic discharge.
1
Prior to upgrading your system, download and install the latest system
BIOS version from
support.dell.com
.
2
Turn off the system, including any attached peripherals, and disconnect
the system from the electrical outlet.
3
Open the system. See "Opening the System" on page 65.
4
Remove the PEM. See "Removing the PEM or PEM Shell" on page 73.
5
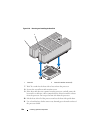
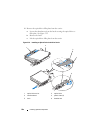
Remove the cooling shroud assembly:
– If you are removing a processor on the system board, see "Removing
the Cooling Shroud Assembly" on page 69.
– If you are removing a processor on the PEM, see Figure 3-9.
CAUTION: The processor and heat sink can become extremely hot. Be sure the
processor has had sufficient time to cool to a lower temperature before handling.
NOTICE: When you remove the heat sink, the possibility exists that the processor
might adhere to the heat sink and be removed from the socket. It is recommended
that you remove the heat sink while the processor is warm.
NOTICE: Never remove the heat sink from a processor unless you intend to remove
the processor. The heat sink is necessary to maintain proper thermal conditions.
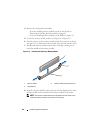
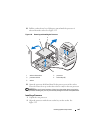
6
Loosen one of the heat-sink retention screws. See Figure 3-20.