


Installing System Components 135
Installing the System Board
1
Transfer the processors and heat sinks to the new system board. See
"Removing a Processor" on page 99 and "Installing a Processor" on
page 101.
2
Remove the memory modules and transfer them to the same locations on
the new board. See "Removing Memory Modules" on page 97 and
"Installing Memory Modules" on page 95.
3
Transfer the riser board to the new system board. See "Removing the Riser
Board" on page 81 and "Replacing the PEM or PEM Shell" on page 76.
4
Install the new system board:
a
Holding the system board by the heat sinks, lower the right side of the
system board into the chassis.
b
Slowly lower the left side of the system board into the chassis.
NOTE: Ensure that the power cables from the power distribution board do not
impede the system board as you lower the system board into the chassis.
c
Slightly lift up the front of the system board and maneuver the system
board to the bottom of the chassis until it lays completely flat.
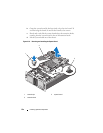
d
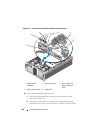
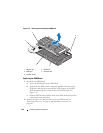
Ensure that all retention hooks on the bottom of the chassis are
inserted into the retention slots on the system board. See Figure 3-35.
e
Push the system board toward the back of the chassis until the blue
retention pin snaps into place.
5
If applicable, transfer the internal USB key, SD card, and TOE/iSCSI key.
6
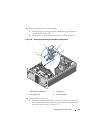
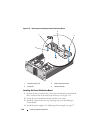
Install the RAID battery compartment:
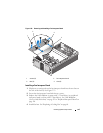
a
Insert the two securing tabs on the battery compartment into the two
securing slots on the side of the chassis. See Figure 3-34.
b
Press down the battery compartment to secure it.
7
Connect the cables in the order listed below (see Figure 6-1 and Figure 6-3
for the locations of the connectors on the system board and on the SAS
backplane):
• The three power distribution cables
• SAS power cable SAS backplane power connector