


Removing and Replacing Parts 4-5
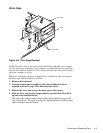
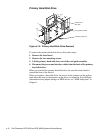
Drive Cage
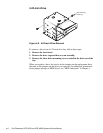
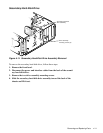
Figure 4-5. Drive Cage Removal
NOTE: The drive cage is the same in both the desktop and mini tower comput-
ers. The drive cage in the mini tower computer is mounted 90 degrees clockwise
from the one shown in Figure 4-5. This rotation positions the drives horizontally
when the computer is set up.
Whenever you need to remove or install a drive in the drive cage, first remove
the drive cage from the chassis as follows:
1. Remove the front bezel.
2. Note the location and orientation of all cables attached to drives
installed in the drive cage. Then disconnect the cables.
3. Remove the screw that secures the drive cage to the chassis.
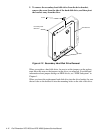
4. Slide the drive cage forward approximately one-half inch. Then lift it
up and away from the chassis.
The side of the chassis contains a detent that secures the drive cage to the
side of the chassis. The drive cage may be slightly difficult to slide forward
until it detaches from this detent.
screw
drive cage
drive cage slots