


Removing and Replacing Parts 4-23
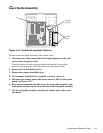
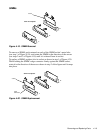
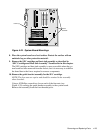
Figure 4-24. System Board Mountings
8. Place the system board on a level surface. Protect the surface with an
antistatic bag or other protective material.
9. Remove the SEC cartridge and heat sink assembly as described in
“SEC Cartridge and Heat Sink Assembly” found earlier in this chapter.
The SEC cartridge and heat sink assembly is more accessible when the sys-
tem board has been removed from the chassis, but it is necessary to stabilize
the board due to the forces required to remove components.
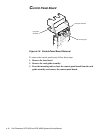
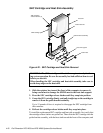
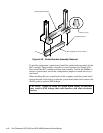
10. Remove the guide bracket assembly for the SEC cartridge.
NOTE: The four nuts are captive and should be retained in the assembly
when loosened.
Using a #2 Phillips screwdriver, loosen each of the four nuts (see
Figure 4-25) securing the guide bracket assembly to the system board.
Remove the assembly from the four threaded posts.
screws (5)
plastic
standoffs