


DES-3326 Layer 3 Fast Ethernet Switch User’s Guide
USING WEB-BASED MANAGEMENT
Setting Up Web Management
Before running Web-based management, some basic configuration of the switch may need to be
performed. The following at a minimum must be configured or known for the switch to be managed:
• IP Address
• Administrator password
In addition, several other parameters may need to be configured or known to properly communicate
with the switch or allow full management capability. These include:
• Default Gateway
• Trap Destination and Community Name
Configuration of these items may be made from the User Interface, which is accessible via either the
serial console or Telnet. Refer to the User’s Guide that came with your system for more information
describing the required configuration.
Setting an IP Address
The IP address for the switch must be set before it can be managed with the Web-based manager. The
switch IP address may be automatically set using BOOTP protocol, in which case the actual address
assigned to the switch must be known.
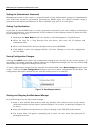
The IP address may alternatively be set manually as follows:
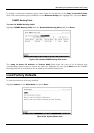
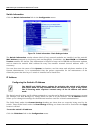
1. Starting at the Main Menu of the User Interface, select Remote Management Setup.
2. Enter the IP address in the New Switch IP Settings section of the Remote Management
Setup screen.
3. Enter a Subnet Mask in the next field.
4. Click APPLY to make the change effective. Use Save Changes from the Main Menu to enter
the IP address into NV-RAM.
Setting a Default Gateway
The default gateway parameter defines the IP address of a router or other network device to which IP
packets are to be sent if destined for an interface outside of that in which the switch is operating. This
parameter must be set if you are attempting to manage the switch from a remote network or across the
Internet.
1. Starting at the Main Menu of the User Interface, select Remote Management Setup.
2. Enter the Gateway IP address of the router in the Default Gateway field in the New Switch
IP Settings section of the Remote Management Setup screen.
3. Click APPLY to make the change effective. Use Save Changes from the Main Menu to enter
the IP address into NV-RAM.
190