


UM1M820BNA User Instructions
Issue AH, March 4, 2013 Spec No. 1M820BNA (Model M820B)
Spec No. 1M820DNA (Model M820D)
20 Chapter 2. Operation
This document is property of Emerson Network Power, Energy Systems, North America, Inc. and contains confidential and proprietary information owned by Emerson Network Power, Energy
Systems, North America, Inc. Any copying, use, or disclosure of it without the written permission of Emerson Network Power, Energy Systems, North America, Inc. is strictly prohibited.
Subnet Mask: 255.255.255.0
Default Gateway: 192.168.1.1
5) Change your local computer’s network settings using the information you acquired in Step 4),
except that the last part of the IP address needs to be replaced with any different number.
IP Address:
Subnet Mask:
Default Gateway:
Example:
IP Address: 192.168.1.3
Subnet Mask: 255.255.255.0
Default Gateway: 192.168.1.1
6) Select OK. Note that you may have to reboot your local computer for the settings to take effect.
Follow any instruction you see on the screen.
2.4.5 Disabling Proxy Server Settings to Enable a Connection
to the Controller over an Intranet Network (if required)
Note: This procedure needs to be performed only when the Controller is connected to an Intranet and the
User’s computer is set to access the Intranet through a proxy server. Note that if the Controller is
connected to the Internet and the User’s computer is connected to an Intranet, the User may not
be able to disable the proxy server and access the Controller.
If the Controller’s Ethernet Port is connected to your company’s Intranet Network and your computer is
also connected to the Intranet Network but requires access via a proxy server, you must disable the proxy
server settings to access the Controller. Follow the procedure below to disable the proxy server settings.
Procedure
1) Launch “Internet Explorer”.
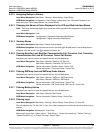
2) Select Internet Options from the Tools menu. The “Internet Options” window opens. In the
“Internet Options” window, select the Connections Tab.
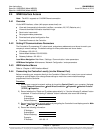
3) Click on the LAN Settings... button. The following window opens. In the LAN Settings window,
uncheck the Proxy Server box and click OK.