


HTML Control and IPL File Manager, cont’d
GSS 100 Graphic Still Store • HTML Control and IPL File Manager
GSS 100 Graphic Still Store • HTML Control and IPL File Manager
5-45-4
5-55-5
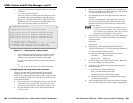
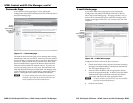
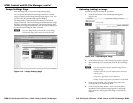
6. Execute a ping command using the GSS’s new IP address
as follows:
C:\> ping 10.13.170.15 {Enter}
After you send this command, the GSS changes to to the
new address and starts responding to the ping requests
(figure 5-1). The GSS’s IP address is updated to the new
address and you can reconnect using either Telnet or the
Web to verify that the update was successful.
C:\>ping 10.13.170.15
Pinging 10.13.170.15 with 32 bytes of data:
Reply from 10.13.170.15: bytes=32 time<10ms TTL=128
Reply from 10.13.170.15: bytes=32 time<10ms TTL=128
Reply from 10.13.170.15: bytes=32 time<10ms TTL=128
Reply from 10.13.170.15: bytes=32 time<10ms TTL=128
Ping statistics for 10.13.170.15:
Packets: Sent = 4, Received = 4, Lost = 0 (0% loss),
Approximate round trip times in milli-seconds:
Minimum = 0ms, Maximum = 0ms, Average = 0ms
Figure 5-1 — GSS response to ping request
7. After the GSS responds to the ping command, issue the
arp -d command at the DOS prompt to remove the IP
address that you specified in step 5 from the ARP:
C:\> arp -d {IP address} {Enter} (to remove the stated IP
address)
or
c:\> arp -d* {Enter} (to remove all static IP addresses)
Configuring the GSS using a direct PC connection
This type of connection is used to initially connect to and
configure the GSS. The GSS’s default settings (IP address,
subnet mask, and optional administrator name and password)
must be changed in order to use the GSS on an intranet (LAN)
on the Internet (WAN).
1. Plug one end of a CAT 5 Ethernet crossover cable into the
rear panel LAN port on the GSS. See Cabling and RJ-45
connector wiring in chapter 2, Installation to make a cable.
2. Plug the other end of the CAT 5 cable into the Ethernet
port on your PC.
3. Right-click the Network Neighborhood or My Network
icon on your Windows (98, 2000, NT, ME, or XP) desktop
and select Properties from the menu.
4. Select Internet Protocol (TCP/IP) from the list and click
Properties.
(If you are using Windows 2000, right-click Local Area
Connection and select Properties from the menu, select
Internet Protocol [TCP/IP] from the list, and then click
Properties again.)
N
If Internet Protocol (TCP/IP) is not available or is not
on the list, it must be installed. Refer to your Windows
user’s manual or your computer’s online Help system for
information on installing the TCP/IP protocol.
5. Note the GSS’s current IP address and subnet mask below:
If your PC is set to “Obtain an IP address automatically,”
note that instead.
IP address:_____________________________________
Subnet mask:___________________________________
6. Depending on your operating system, click either
“Specify an IP address” or “Use the following IP address,“.
a. Leave the default gateway blank.
b. Enter the following IP and subnet mask values:
IP address: 192.168.254.253
Subnet mask: 255.255.0.0
7. Save the changes and exit the Network setup. Reboot the
PC for the changes to become effective.
8. Launch your PC’s Web browser (Netscape Navigator or
Internet Explorer).
a. In the browser’s address field, enter:
http://192.168.254.254/index.html
The GSS displays the default startup page.
b. Configure the GSS (see the remainder of this chapter
for configuring the GSS).
9. After configuring the GSS, repeat steps 3 and 4, changing
your TCP/IP settings back to their original configuration.