


FARGO Electronics Inc.
HDP700 Series Card Printer 4-35
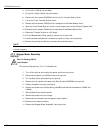
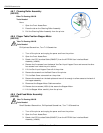
4.7.8 Drive Pulley — Back -- 2
(D850190)
Refer To Drawing 840151
Tools Needed
Torx T-10 Screwdriver, Standard Screwdriver
1. Turn off the printer and unplug the power cord from the printer.
2. Remove the screws from the Back Cover of the printer.
3. Tilt the Back Cover outwards from the printer.
4. Remove the four screws that secure the Rear Bracket (D840585) to the printer.
5. Detach the cables running to the board.
6. Remove the screw from the Gas Spring (840366) and take off the Washers (130283 and
140040).
7. Set the Back Cover carefully aside.
8. Use the standard screwdriver to hold back the locking tab on the drive gear while pulling it
from the shaft.
9. Use the standard screwdriver to remove the retaining clip
10. Pull the Drive Pulley (D850190) from the printer.
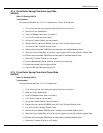
4.7.9 Gear - Card Transport --2
(760330)
Refer To Drawing 840151
Tools Needed
Torx T-10 Screwdriver, Standard Screwdriver
1. Turn off the printer and unplug the power cord from the printer.
2. Remove the screws from the Back Cover of the printer.
3. Tilt the Back Cover outwards from the printer.
4. Remove the four screws that secure the Rear Bracket (D840585) to the printer.
5. Detach the cables running to the board.
6. Remove the screw from the Gas Spring (840366) and take off the Washers (130283 and
140040).
7. Set the Back Cover carefully aside.
8. Use the standard screwdriver to hold back the locking tab on the drive gear while pulling it
from the shaft.
9. Remove the gear from the printer.