


Section 6: Using Your Card Printer 39
Pro-L Card Printer Users Manual
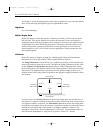
HINT
Notice the direction the Vertical and Horizontal adjustment arrows point within the Printing
Position window are representative of the direction the printed image moves on the card.
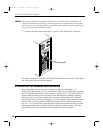
The Lamination Placement control allows you to adjust the horizontal position of
the PolyGuard overlaminate. This control functions in the exact same fashion as the
Image Placement controls, except only the horizontal position of the overlaminate
requires adjustment. To adjust the Lamination Placement, click on the Horizontal
adjustment arrows. To move the overlaminate more toward the card output side of
the printer, enter a positive number. To move the overlaminate more toward the
card input side of the printer, enter a negative number. The maximum value for the
Horizontal adjustment is ±100 pixels (10 pixels = about .03/.8mm). ). To adjust the
Vertical placement of the PolyGuard overlaminate, refer to Section 8-D.
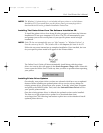
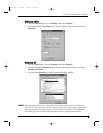
Select the Sensors button to display options for calibrating the printers Ribbon
Sensor and its Lamination Sensor. Although rare, the sensors may need to be
occasionally recalibrated according to the instructions given the in the Calibration
window. Recalibrate the Ribbon Sensor if the printer seems to skip ribbon panels,
print ribbon panels out of the usual YMCK order (resulting in strangely colored
output), or simply wind the ribbon until the printers Ready LED light flashes.
Likewise, recalibrate the Lamination Sensor if the printer seems to skip PolyGuard
chips or wind the PolyGuard roll until the printers Ready LED light flashes.
The Calibrate option also allows you to send a simple self test print to the printer
by clicking on the Self Test button. This function will send a file named
PROLTEST.PRN which is automatically installed with the printer driver and
stored in the c:\Windows\System directory. You must have a Full-Color YMCKO
ribbon installed when printing the default test print.
This test print procedure can be helpful in assuring that your computer is
effectively communicating with the printer and that the printer is functioning
properly. If you would like to bypass your computer and print a self test directly
from the printer, see the self test procedure described in Section 4-E.
NOTE:
If you would like to send your own test file, simply create a PRN file, name it
PROLTEST.PRN, and save it in the c:\Windows\System directory in place of the
existing test file. Be sure the appropriate print supplies are installed according to the Ribbon
Type option you selected when the new PRN file was created.
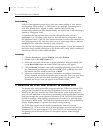
Card Size
Allows you to select the appropriate card size option for the type of cards you are
using. The Std CR-80 and Oversize selections allow you to print and overlay the
entire printable area of a standard or oversized card. The Smart Card, Magstripe,
and Punch Offset selections allow you to print and overlay only within the given
card areas. The Smart Chip and Signature Panel selections allow you to print and
overlay anywhere on a card except over the immediate location of a standard smart
card chip or signature panel. These selections prevent you from printing over or
proL.qxd 8/6/2000 3:30 PM Page 39