


Section 8: Mechanical Adjustments 59
Pro-L Card Printer Users Manual
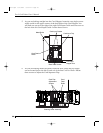
3. As you are looking inside the printer from the front, locate the Internal Card
Guide on the left-hand side (the lamination side) of the printer. This guide
straddles the laminators black Drive Roller.
4. Remove the single screw from the two holes residing to the immediate right of
the laminators Internal Card Guide.
5. With your left hand, pull the laminators spring-loaded Internal Card Guide
toward you. If printing onto cards which are over 2.3 in width, pull the
Internal Card Guide back behind the top-most hole (the hole furthest from the
front of the printer) and re-insert the screw into this hole. Adjustment to the
laminators Internal Card Guide is now complete.
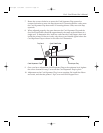
6. Now, locate the Internal Card Guide on the right-hand side (the card input
side) of the printer.
7. Remove the single screw from the two holes residing to the immediate right of
this Internal Card Guide.
8. With your left hand, pull the spring-loaded Internal Card Guide toward you. If
printing onto cards which are between 2.3 and 2.5 in width, pull the Internal
Card Guide back behind the top-most hole (the hole furthest from the front of
the printer) and re-insert the screw into this hole.
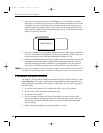
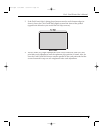
9. If printing onto cards between 2.5 and 2.6 in width, loosen the Internal Card
Guides mounting screws (shown above), slide the Card Guide assembly all the
way toward the front of the printer, and retighten the screws. Then, pull the
Internal Card Guide back behind the bottom-most hole (the hole closest to the
front of the printer) and re-insert the screw into this hole. Adjustment to the
second Internal Card Guide is now complete.
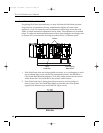
C. ADJUSTING THE CARD SEPARATOR FLAP
The Card Separator Flap resides inside the printer and helps prevent two cards
from feeding simultaneously. This flap is adjustable to accommodate varying card
thicknesses. Although the Card Separator Flap will automatically adjust to slight
card thickness variations, a manual adjustment should be made in order for the
printer to consistently feed single cards which vary from the standard CR-80 .030
card thickness. To adjust the Card Separator Flap, refer to the following steps:
1. Open the Card Hopper Door located on the right-hand side of the printers
exterior by grasping the top of the door and pulling straight down. Allow the
door to swing completely open.
2. Remove all cards from the Card Hopper.
3. Open the top-right cover of the printer by pressing its Cover Release Button.
Allow the cover to swing up and open.
4. Remove the ribbon from the printer.
proL.qxd 8/6/2000 3:30 PM Page 59