


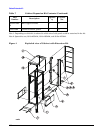


Cabinet Extension Kit
122
Before installing the cabinet extension kit parts, you must first remove parts from the existing cabinet. Some
of the parts (see note) removed are not usable with the cabinet extension kit or the rp7400 system.
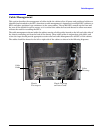
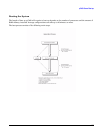
Preparing the Cabinet
1. Remove the cabinet plastic, side panels, by pulling them away from the cabinet (snap releases from the
front).
2. Disconnect the ground wire from the back door.
3. Remove the rear door by opening it at approximately a 45 degree angle. Grasp the door and lift it up to
disengage the door hinge pins.
4. Remove the top panel by pushing it forward from the rear, then lifting it up and off the cabinet.
5. Remove the door support bracket from the top of the cabinet frame.
6. Remove the door hinges from the cabinet vertical rails.
7. Remove the door latch plate from the cabinet vertical rails.
8. Remove any column mounted PDUs.
NOTE The cabinet top panel, door hinges, and door latch plate, can be discarded, they are not used on
a cabinet with the extension kit installed.
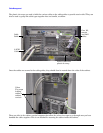
Cabinet Expansion Kit Installation
1. From the back, place the deep top panel over the top of the cabinet, with the front angled down and
slightly forward so the tabs on the top panel can slide back into the slots on the front of the cabinet. Lower
the back of the top panel down and pull the top panel toward the back until it is fully seated on top of the
cabinet.
2. Snap the new, plastic cabinet forehead onto the front edge of the top panel.
3. Start a screw into the screw hole under the lower edge of the top panel. Do not tighten it, but make sure it
is in by two or three turns.
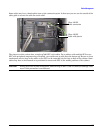
4. Hang a side panel from either the left or right side screw inserted in the top panel in step 3.
5. Insert five (5) T25 mounting screws through the side panel into the cabinet vertical frame. Note, for the
1.2m (A5541-00001) side panel, you will only insert three (3) T25 screws.
6. Repeat steps 3 through 5 for the other side.
7. Place the lower brace across the bottom of the side panels and insert four (two on each side) T25 screws
through the brace into the side panels.
8. Tighten all the T25 screws.
9. Attach the door hinges to the left side panel with four (two for each hinge) T25 screws.
10. Attach the door latch to the right side panel with two (2) T25 screws.
11. Attach the door stabilizer to the under side of the top panel with one (1) T25 screw.