


Add-On Memory
150
Step 1. Remove Power From the System
CAUTION Before starting any shut down type procedures, be sure to check with the System
Administrator or customer to ensure a system backup has been performed recently.
To shut down and power off the rp7400 computer system, perform the following steps.
a. Stop all active applications.
b. Perform a normal Operating System shut down, informing all logged on users of the impending
shut down.
c. Once the Operating system has halted, put the power switch in the standby (0) position.
CAUTION With the power switch in the standby position, there is still power to the inside of
the SPU.
d. Remove A.C. from the SPU by unplugging the power cords (up to 3) from the back of the SPU.
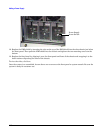
Step 2. Remove the Front Bezel
a. Grasp the front bezel on each side.
b. Pull the front bezel away from the cabinet.
Step 3. Extend the SPU out the Back of the Cabinet
CAUTION Be aware of the cables at the back of the SPU while moving the SPU in or out of the
cabinet.
To extend the SPU out the back of the cabinet:
a. Remove the four (two on each side) retainer screws, holding the bezel flange to the cabinet
vertical post.
b. Carefully extend the SPU out the front of the cabinet approximately 2 to 4 inches.
c. Loosen the six (three on each side) mounting screws holding the bezel brackets to the side of the
SPU.
d. Lift the bezel bracket up and off the SPU chassis. Be sure that both left and right side brackets
are removed.
e. Be sure the rear door is open and does not swing closed during the SPU movement. If necessary
the rear door can be removed
f. Carefully extend the SPU out the back of the cabinet until the stops on the rails halt reward
motion.