


Add-On Memory
154
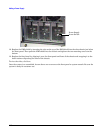
Step 12. Replace the Front Bezel
To replace the front bezel, perform the following steps:
a. Align the front bezel over the front of the SPU.
b. Press the front bezel onto the cabinet until it snaps into place.
Step 13. Power the System On
CAUTION Before applying A.C. power to an rp7400 computer, be sure all covers and cooling
fans are properly installed. Failure to perform this check could result in decreased
computer component life and reliability.
a. Be sure all connected peripherals are on, with no errors or faults indicated.
b. Be sure the SPU power switch is in the standby (0) position.
CAUTION When the power cords are connected to the SPU, there will be power present
inside the SPU chassis, even with the power switch in the standby position.
c. Carefully insert the A.C. power cords (3) into the line filter receptacles at the back of the SPU.
NOTE Be sure to plug all three power cords into the back of the SPU. Also be sure the
cabinet PDU is plugged into an appropriate wall outlet.
d. Put the power switch in the on (|) position. At this time you will hear the cooling fans coming up
to speed and being synchronized. This creates a high pitched squeak for a few seconds. The fans
should drop to normal speed within a few seconds. If not check the front panel or console for
fault indications.
e. Check all front panel LEDs for normal indications, with no warnings ar faults indicated.
The SPU should take a few minutes to perform all selftests and initialization routines. At the end of
this you should be able to launch the operating system or initiate other software routines.
Step 14. Verify the Installation
Issue the ME command in the boot console handler to verify the system recognizes the new memory
configuration.