


IBM System Storage DR550 Version 3.0 ------17 March 2006 Page 33
IBM Storage Systems Copyright © 2006 by International Business Machines Corporation
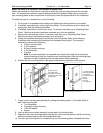
CAUTION: The stabilizer must be firmly attached to the bottom rear of the rack to prevent the
rack from turning over when the drawers are pulled out of the rack. Do not pull out or install
any drawer or feature if the stabilizer is not attached to the rack.
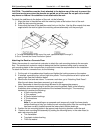
To attach the stabilizers to the bottom of the rack, do the following:
1. Align the slots in the stabilizer with the mounting holes at the bottom front of the rack.
2. Install the two mounting screws.
3. Ensure that the base of the stabilizer rests firmly on the floor. Use the Allen wrench that was
supplied with the rack to tighten the mounting screws alternately until they are tight.
4. To install the stabilizer on the rear of the rack, repeat sub steps 1 through 3.
5. Go to “Connect the Power Distribution System”
Attaching the Rack to a Concrete Floor
Obtain the services of a mechanical contractor to attach the rack-mounting plates to the concrete
floor. The mechanical contractor needs to determine that the hardware being used to secure the
rack-mounting plates to the concrete floor is sufficient to meet the requirements for the installation.
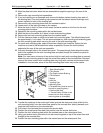
To attach the rack to a concrete floor, do the following:
1. Put the rack in its predetermined location and tighten the locking screws on the casters.
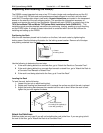
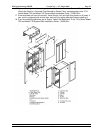
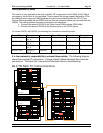
2. If installed, remove the top, left and right trim panels. The trim panels are held in place with
spring clips. See the illustration below.
3. Remove the front and rear doors. To remove a rack door, go to “Attaching Rack Doors”.
After the rack doors have been removed, go to sub step 4.
Note: Remember to have the door keys delivered to the appropriate persons.
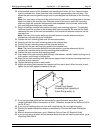
4. Locate the hardware mounting kit and the two mounting plates. Refer to the following
illustration when reviewing the contents of the hardware mounting kit. The mounting
hardware kit contains the following:
a. 4 Rack-mounting bolts
b. 4 Thin washers
c. 8 Plastic isolator bushings
d. 4 Thick washers
e. 4 Spacer
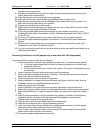
Note: If you are installing an ac-powered rack, temporarily install the lower plastic
isolator bushings to help you locate the rack mounting plate. After the mounting plate
has been correctly located remove the lower plastic isolator bushings.
5. Position the two mounting plates in the approximate mounting location under the rack.
6. Create a rack-mounting bolt assembly by adding the following items, in the order listed, to
each rack-mounting bolt
a. Thin flat washer
b. Top plastic isolator bushing
c. Thick flat washer