


Chapter 3---Service Adjustments
3-16 Model 330, 340SC, 370SC Service Manual
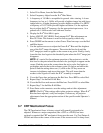
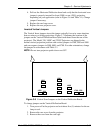
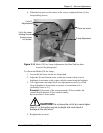
4. Pull out the Vertical Deflection Board and verify the vertical jumpers are
inserted in the correct jacks, depending on your application (refer to Table
3-1 and Figure 3-7). Change jumpers if necessary.
5. Replace the card cage cover and rear projector cover.
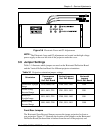
3.10 G2 Adjustment
NOTE:
For convenience, HJT provides factory-preset channels. These channels
are covered in Chapter 4 of the Operator's Manual. Adjusting G2 affects the image
quality of these preset channels. Before adjusting G2, verify that the preset
channels can't be used as is. G2 adjustments are located on the High Voltage
Power Supply on the left-rear side of the projector. A protective label is placed
over the G2 and Electronic Focus adjustments after they are preset at the factory.
This label can be punched through with an adjustment screwdriver or removed by
a qualified technician.
G2 needs to be reset only when:
▼
A major component like a CRT; or ILA
®
has been replaced;
▼
The high voltage power supply has been repaired; or
▼
If the picture size or aspect ratio changes.
When the projector is set up for new sources, the Threshold Offset must be set to
the default level of 80 prior to setting G
2
.
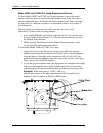
Sensitivity/Threshold Offset
To set the Sensitivity/Threshold Offset for a new source:
1. Select a channel from the channel list.
2. Press CONV to access Convergence mode.
3. Press MODE and toggle to Sensitivity or Threshold.
4. Press MENU to display the SHADE AXIS MENU on the screen.
5. Select CLEAR SHADE AXES (clears Sensitivity to the default level of
128 and Threshold to the default level of 80).
6. From the SHADE AXIS MENU select INIT ALL PROPTN. This
initializes all Proportions to 230.
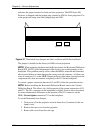
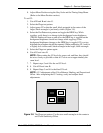
G2 Setting
G2 sets the threshold of the CRT image and is adjusted along with Sensitivity
Offset using the Pluge test pattern. These two settings determine the level of the
darkest and brightest areas of the screen image. G2 is preset at the factory and may
need little or no adjustment. Do these adjustments in sequence, one color at a
time.
7. Adjust for full size image on the screen. (Refer to the sections on
Position/Phase and Size).