


NIC Installation and Verification
July 1998 2-5
I
N
S
T
A
L
L
A
T
I
O
N
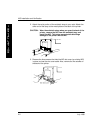
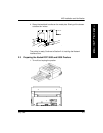
2. Hold the card so that the printer connector is facing down and the
network cable receptacle is toward you.
3. Tilt the card at about a 30-degree angle, and slide the front into the
NIC slot. Seat the card by positioning the connector on the bottom of
the card against the receptacle on the mother board. Press the card
gently into place.
The network cable receptacle should be accessible through the front
of the slot.
4. Secure the NIC faceplate to the printer / proofer back plate by
replacing the three screws you removed.
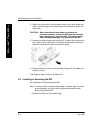
5. Grasp the handles on the back of the printer and slide the back of the
printer in.
6. Replace any back panel screws that you removed.
7. Attach the Ethernet cable to the network cable receptacle on the NIC.
8. Plug in the power cord.
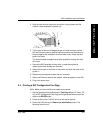
2.5 Printing a NIC Configuration Test Page
Note: Make sure that the Ethernet cable is connected.
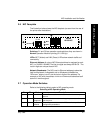
1. Set the Operational Mode Switches in Test Page Mode (D1 Down, D2
Up). A NIC Configuration Test Page will be generated when the printer
reaches its READY state.
2. Power up the printer. The NIC will do a self-test at startup.
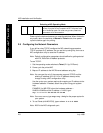
3. Check the LEDs during the Power Up/ Initialization phase. The
following should occur: