


Novell NetWare
July 1998 4-3
N
O
V
E
L
L
N
E
T
W
A
R
E
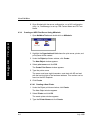
9. After typing in the names of the three objects, select Printer Type and
press [Enter].
10.Select Other/Unknown.
11.When Þnished, press [ESC] to Save changes.
The volume Þeld is Þlled in by PCONSOLE with the name of the nearest
volume. This is the name of the server volume that will hold the
queued jobs for the print server.
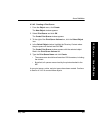
12.Turn off the Banners to eliminate user ID pages.
Note: If a user ID page is desired, the type of banner should be
ÒPostScriptÓ (not ÒtextÓ) for PostScript mode print jobs. The banner
must be OFF for Raster mode print jobs since ÒPostScriptÓ or ÒTextÓ
banners will cause the print job to fail (Printer will process job and
return to ÒREADYÓ without generating a print).
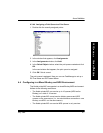
4.3.2 Configuring the NIC for NDS
ConÞgure a DS Tree Name and DS Context Name on the NIC. (You can
also use FastManage to conÞgure these two parameters.)
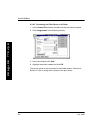
4.3.3 Additional Queues
The print server contains the name of a printer to service. The printer
contains a list of print queues belonging to it.
To add queues to the print server service:
1. Choose Printers under the Available Options window.
2. Select the printer created and press [Enter].
3. Select Print Queues Assigned. Pressing [Insert] allows a user to
choose from a list of created queues.
4. Create new print queues by pressing [Insert] again.
Once an object is created, it must remain in that context until deleted.
By default, quick setup creates these objects in the same context;
however, users have full control of the object context. Note the context
name at the top of the screen.
5. Press [ESC] to Exit.