


5 Press .
6 If you set a PIN during network setup:
a Press or repeatedly until the number you want appears.
b Press to save the entry and move to the next digit.
c Repeat step a and step b for the next three numeric spaces.
7 Press or repeatedly until the destination to which you want to scan appears.
8 Press Start Color or Start Black.
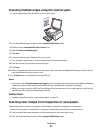
9 If you want to save the scanned image, from the software application on the computer, click File Save As.
10 Enter the file name, format, and location where you want the scanned image to be saved.
11 Click Save.
Related topics:
• “Setting a network printer to scan” on page 0
Managing scan jobs
Canceling a scan job
To cancel a scan using the control panel:
1 Press .
Scanning stops and the scanner bar returns to its home position.
2 Press to turn off the printer.
To cancel a scan using the software:
1 From the Finder desktop, double-click the Lexmark 5300 Series folder.
2 Double-click the Lexmark 5300 Series Center icon.
3 From the Progress dialog, click Cancel.
Related topics:
• “Using the control panel” on page 88
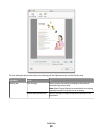
Learning about the All-In-One Center scan options
Adjusting the brightness of an image
1 From the Finder desktop, double-click the Lexmark 5300 Series folder.
2 Double-click the Lexmark 5300 Series Center icon.
3 From the All-In-One Center, click Preview/Edit to open the Scan dialog.
4 Click to open the Scan Settings drawer.
Scanning
35