


Setting up to fax while behind a PBX
If the printer is being used in a business or office, it may be connected to a Private Branch Exchange (PBX) telephone
system. Ordinarily, when dialing a fax number, the printer waits to recognize the dial tone and then dials the fax
number. However, this method of dialing may not work if the PBX telephone system uses a dial tone that is not
recognizable to most fax machines. The “Dialing while behind a PBX” feature enables the printer to dial the fax number
without waiting to recognize the dial tone.
1 From the control panel, press Fax Mode.
2 Press .
3 Press or repeatedly until Fax Setup appears.
4 Press .
5 Press or repeatedly until Dialing and Sending appears.
6 Press .
7 Press or repeatedly until Dial Method appears.
8 Press .
9 Press or repeatedly until Behind PBX appears.
10 Press to save this setting.
Related topics:
• “Using the control panel” on page 88
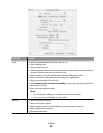
Customizing fax settings
Setting up a fax header
During the initial setup of your printer, you were prompted to enter your name, fax number, date, and time. This
information is used to create a fax header for faxes you send.
If you have not entered this information:
1 From the control panel, press Fax Mode.
2 Press .
3 Press or repeatedly until Fax Setup appears.
4 Press .
5 Press or repeatedly until Dialing and Sending appears.
6 Press .
7 Press or repeatedly until Your Fax Name appears.
8 Press .
9 Enter your name using the keypad.
Note: You can enter a maximum of 20 characters.
10 Press to save the setting.
Faxing
60