


Menu Item Action
Quality
1
Adjust the quality of printed photos.
Paper Type
1, 2
Specify the type of paper loaded.
Note: The printer is equipped with an automatic paper type sensing device.
The Paper Type Sensor automatically detects the type of paper that has been
loaded into the printer and adjusts the settings for you.
1
Setting will return to factory default setting when the PictBridge-enabled digital camera is removed.
2
Setting must be saved individually. For more information, see “Saving settings” on page 95.
Related topics:
• “Using the control panel” on page 88
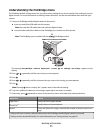
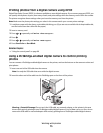
Printing photos stored on the memory device using the proof sheet
1 Load plain letter- or A4-size paper.
2 Insert a memory card or flash drive that contains the images you want to print.
3 Press or repeatedly until Proof Sheet appears.
4 Press .
5 Press or repeatedly until Print Proof Sheet appears.
6 Press .
7 Press or to specify which category of photos you want to print.
You can print a proof sheet:
• For all photos on the memory card
• For the 20 most recent photos, if there are 20 or more photos on the card
• By date, if the photos on the card were taken on more than one date
8 Press .
9 Press again.
One or more proof sheets print.
10 Follow the instructions on the proof sheet to select which photos to print, the number of copies, red-eye reduction,
page layout, print options, color effects, and paper size.
Note: When making selections, make sure you completely fill in the circles.
11 Load the proof sheet facedown on the scanner glass.
12 If needed, press or repeatedly until Scan Proof Sheet appears.
13 Press .
14 Press Start Color or Start Black to scan the proof sheet.
Working with photos
72