


3 Add the printer (see “Add the printer” on page 55).
4 A second print queue will be created. Remove the wireless queue if you do not want to switch back to accessing
the printer over a wireless connection.
Note: The wireless interface of the printer is disabled while it is connected to an Ethernet network.
Printer currently set up locally (using USB connection)
1 Plug one end of an Ethernet cable into the printer and the other end into an available port on a switch or wall
jack.
2 Insert the software and installation CD into the computer you want to use to configure the printer.
3 Follow the on-screen instructions for configuring a printer on an Ethernet network.
Note: You will need a USB cable to complete the configuration.
Add the printer
In Mac OS X version 10.5
1 From the menu bar, click System Preferences.
2 Click Print & Fax under the Hardware section.
3 Click +.
4 Select the printer from the list and click Add.
In Mac OS X version 10.4 or earlier
1 From the Finder desktop, choose Go Applications Utilities Print Center or Printer Setup Utility,
depending on the operating system version you are using.
The Printer List dialog appears.
2 Choose the printer you want to use.
3 Click Add.
The Printer Browser appears.
4 Select your printer.
5 Click Add.
Advanced wireless setup
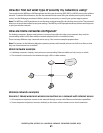
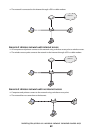
Creating an ad hoc wireless network
The recommended way to set up your wireless network is to use a wireless access point (wireless router). A network
set up this way is called an infrastructure network. If you have an infrastructure network, you should configure the
printer for use on that network.
Note: The printer can communicate on only one wireless network at a time. Configuring the printer for an ad hoc
wireless network will keep it from working on any other wireless network, either ad hoc or infrastructure.
Installing the printer on a wireless network (selected models only)
55