


For Macintosh users
1 Create a network name.
In Mac OS X version 10.5
a
From the Finder desktop, click System Preferences.
b Click Network.
c Click AirPort.
In Mac OS X version 10.4 and earlier
a
From the Finder desktop, click Go Applications.
b From the Applications folder, double-click Internet Connect.
c From the toolbar, click AirPort.
2 From the Network menu, click Create Network.
3 Create a name for the ad hoc network, and then click OK.
Note: Store the network name and password in a safe place for future reference.
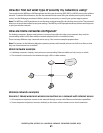
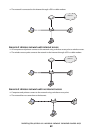
Adding a printer to an existing ad hoc wireless network
Note: The printer can communicate on only one wireless network at a time. Configuring the printer for an ad hoc
wireless network will remove it from any other wireless network, either ad hoc or infrastructure, for which it is
configured.
Using Windows
1 Do one of the following:
• In Windows Vista, click .
• In Windows XP and earlier, click Start.
2 Click All Programs or Programs, and then select the printer program folder from the list.
3 Click Lexmark Wireless Setup Utility.
4 Follow the instructions on the Welcome screen.
Using Macintosh
1 From the Finder desktop, double-click the printer folder.
2 Double-click Lexmark Wireless Setup Assistant.
3 Follow the instructions on the Welcome screen.
Using WPS (Wi-Fi Protected Setup)
Wi-Fi Protected Setup (WPS) is a method of configuring devices on a secure wireless network using fewer steps than
in most other methods. The printer supports WPS and can be configured for a wireless access using WPS. In order to
use WPS to configure the printer, the wireless router must support WPS.
Installing the printer on a wireless network (selected models only)
58