


WAN and System Configuration 2-1
CC
CC
hh
hh
aa
aa
pp
pp
tt
tt
ee
ee
rr
rr
22
22
WW
WW
AA
AA
NN
NN
aa
aa
nn
nn
dd
dd
SS
SS
yy
yy
ss
ss
tt
tt
ee
ee
mm
mm
CC
CC
oo
oo
n
n
nn
ff
ff
ii
ii
gg
gg
uu
uu
rr
rr
aa
aa
tt
tt
ii
ii
oo
oo
nn
nn
This chapter describes how to use the console-based management screens to access and configure advanced
features of your equipment. You can customize these features for your individual setup. These menus provide a
powerful method for experienced users to set up their router’s connection profiles and system configuration.
This section covers the following topics:
■ “WAN Configuration” on page 2-1
■ “ADSL Line Configuration screen” on page 2-2
■ “SDSL/IDSL Configuration screen” on page 2-3
■ “G.SHDSL Line Configuration screen” on page 2-6
■ “T1 Line Configuration screen” on page 2-7
■ “Frame Relay Configuration” on page 2-9
■ “Multiple ATM Permanent Virtual Circuits” on page 2-16
■ “Creating a New Connection Profile” on page 2-24
■ “The Default Profile” on page 2-28
■ “Scheduled Connections” on page 2-29
■ “System Configuration Screens” on page 2-35
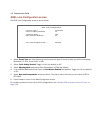
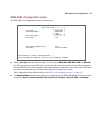
WAN Configuration
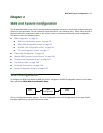
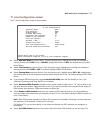
To configure your Wide Area Network (WAN) connection, navigate to the WAN Configuration screen from the Main
Menu and select WAN (Wide Area Network) Setup.
The Line Configuration screen appears. The Line Configuration screen will be appropriate to the type of WAN
interface supported by your particular router model.
Main
Menu
WAN
Configuration
WAN
Setup