


Configuring ISDN and Leased Line Connections 2-37
2. A Frame Relay DLCI Configuration table appears with a prompt
asking you if you want to delete the connection profile you have
just highlighted. Select CONTINUE if you wish to delete this DLCI
or CANCEL if you do not.
You are now done configuring the Frame Relay DLCI Configuration
screen. Press the escape key to return to the WAN Setup screen. Go
to “Connection profiles for ISDN and Leased lines,” beginning on
page 2-13, for information on how to configure your leased line
connection.
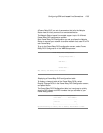
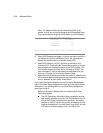
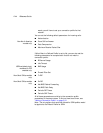
Adding a Frame Relay DLCI configuration
To add a new Frame Relay DLCI, select Add DLCI in the Frame Relay
DLCI Configuration screen. Press Return and the Add DLCI screen
appears.
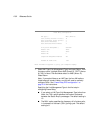
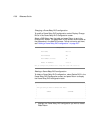
Add DLCI
DLCI Name: DLCI 17
DLCI Enabled: Yes
DLCI Number (16-991): 17
Remote IP Address: 2.0.0.2
Data Flow Parameters---------------Use Default---------Value----
CIR: No 64000
Bc: No 64000
Be: Yes
ADD DLCI NOW CANCEL
Return accepts * Tab toggles * ESC cancels.
1. Select DLCI Name and enter a name for this individual Frame
Relay DLCI profile. It can be any name you wish. For example: the
name of your ISP or remote branch your connecting to such as
the corporate headquarters of your company.