


OVERLAYS AND MACROS > 157
CREATING POSTSCRIPT OVERLAYS
Three steps are required to create an overlay:
1.
Create the form data using your own application software and
print it to a printer (.PRN) file.
2.
Use the Storage Device Manager utility software supplied on
CD with your printer to create a “project file,” import the .PRN
file(s), and download the generated filter (.HST) file to the
printer. The project file will contain one or more overlay images
which are functionally related, such as the cover page and the
continuation page images for business letters.
3.
Use downloaded files to define your overlays ready for use
when printing your documents.
When printing overlay files to disk, do not select any special features,
such as two-sided printing or multiple copies. These are not
appropriate to overlays, they apply only to your final documents.
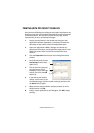
CREATING THE OVERLAY IMAGE
1.
Use your preferred application, perhaps a graphics program,
to create the required overlay image and save it.
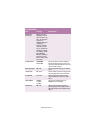
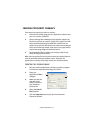
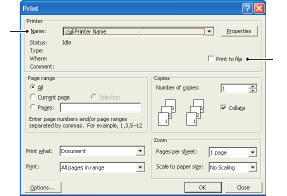
2.
Open your
application’s
Print…
dialogue.
3.
Make sure that the
selected printer
name (1) is that of
your PostScript
printer driver.
4.
Select the
Print To
File
(2) option.
5.
Click the
Properties
button (3) to open the Document
Properties window.
1
2