


35
-
iRIS 220 / iRIS 320, V1.19 User Guide
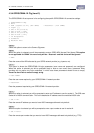
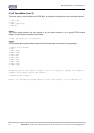
4.3.10 Alarm Selection (Level 4)
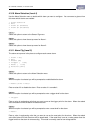
Use the Alarm Selection menu to decide which alarm you want to configure. You can see at a glance from
this menu which alarms are enabled.
* Alarm Selection
0 Exit
1 Alarm #1 (Enabled)
2 Alarm #2 (Disabled)
>
Option 0
Select this option to return to the Sensor Cfg menu.
Option 1
Select this option to view the set-up menu for Alarm 1.
Option 2
Select this option to view the set-up menu for Alarm 2.
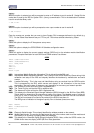
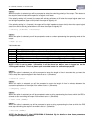
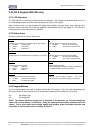
4.3.11 Alarm Cfg (Level 5)
The alarm set-up menu is the place to configure each sensor alarm.
* Alarm 1 Cfg
0 Exit
1 Enable [No]
2 Trigger [ 0.00]
3 Reset [ 0.00]
4 Duration [0min]
>
Option 0
Select this option to return to the Alarm Selection menu.
Option 1
When this option is selected you will be prompted to enable/disable the alarm.
> Enable (0:No 1:Yes)=
Enter a value of 0 to disable the alarm. Enter a value of 1 to enable it.
Option 2
When this option is selected you will be prompted to enter a trigger level for the alarm.
> Trigger=
Enter a value in engineering units that you want to use as the trigger point for the alarm. When the scaled
value exceeds this limit the alarm will become active.
Option 3
When this option is selected you will be prompted to enter a reset level for the alarm.
> Reset=
Enter a value in engineering units that you want to use as the reset point for the alarm. When the scaled
value falls below this limit the alarm will be deactivated. If the reset level is set to a value greater than the
trigger level then the alarm is reverse acting. This mode is normally used for low voltage alarms.