


3URGXFW5HIHUHQFH*XLGH 5-5
&DOLEUDWLQJWKH6FDOH3RXQGV.LORJUDPV
1. Before proceeding, ensure that the scanner/scale has been pre-
pared for this process by performing the preceding steps titled,
Preparing the Scanner/Scale for Calibration.
2. Remove the weigh platter and make sure that there are no
obstructions in the debris chutes.
3. Cut and remove the seal that secures the calibration switch access
cover and remove the cover. This seal may not be present if this is
the initial installation of the scanner/scale.
4. Locate the calibration switch access cover and remove the screw
that holds the cover in place. (See Figure 5-1).
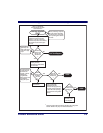
5. Press and release the Calibration Switch to place the scanner/scale
in Calibration Mode (See Figure 5-2). The scanner/scale will
sound a tone indicating that it is in Calibration Mode. If the
motor was spinning when you initiated Calibration Mode, the
motor will stop and the Yellow LED will begin flashing indicating
the scale is in Calibration Mode. The display will show the mes-
sage “ESCL” (empty scale).
6. Reinstall the weigh platter.
7. Press the Zero Push Button. The Yellow LED will go out for
approximately 10 seconds (or less) and the Remote Display will
alternately display and until the scale is
ready to proceed.
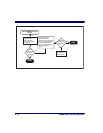
8. When the scale is ready, the Yellow LED will begin blinking again
and the display will show the message “Ad20 (add twenty
pounds)” or “Ad10 (add ten kilograms).” The scanner/scale will
also sound one tone if the scale is weighing in kilograms or two
tones for pounds. Place the correct weight (twenty pounds for cal-
ibration in pounds, or ten kilograms for metric calibration) from
ESD ALERT
To protect static sensitive circuitry, follow Electro-Static Discharge (ESD) pro-
cedures when exposing internal scanner-scale components.