99
11. Appendix D: Sample Use under PL7 PRO
This description remains concise, because it is only meant to describe the overall operation of the program and
the way to use the related screen. If you need further detail, don't hesitate and review the actual content of the
example under PL7 PRO.
The source code is commented by and large to help you understand how this works. Each "program" file starts
with a short description of the way it operates, and each line includes a comment.
Each variable used has a symbol whose name describes its use. Use keyboard shortcuts “
Ctrl+E” and “Ctrl+F”
to display the variables by addresses (e.g. %MW80) or by symbols (e.g. Pkw_checked_boxes_slave).
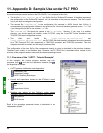
Two animation tables (icon
) have been created, “Lufp7_inputs_outputs” and “Parameter_read_write.” The
first animation table presents the I/O that correspond to the exchanges with the LUFP7 gateway, i.e. %IW4.0 to
%IW4.0.15 and %QW4.0 to %QW4.0.15. The second table presents the I/O related to the aperiodic service for
reading/writing the value of any motor starter parameter, and also some local variables used by this service. In
the context of this example, this service is also called “PKW” due to its limited similarity with the PKW service
implemented on a few other products from
Schneider Electric. N.B. This service was not implemented the same
way as the PKW service and must therefore not be used identically!
11.2. LUFP7 Gateway Initialization and Diagnostics
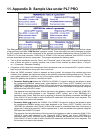
The “LUFP7 gateway exchanges” operating screen comprises four separate sections:
• Hexadecimal display of gateway input data (%IW4.0 to %IW4.0.15) in the INPUTS frame. These inputs are
named and grouped in the same manner as in this guide (see chapter 4.2.9 Configuring the Gateway I/O
under PL7 PRO, page 32). Of course, the display of these input data is correct only if the gateway default
configuration is used.
A green/red LED indicates whether the various input data have already been updated by the gateway. It is
associated to bit 13 (ABC_DU) of the gateway status word.
These input data include periodic Modbus data (controlling and monitoring) and aperiodic
Modbus data (parameter reading/writing). In order for the LED to turn green, a parameter
read command and a parameter write command must both have received a response
from a Modbus slave!
A second green/red LED indicates whether the input data are updated on a periodic basis or not by the
gateway, i.e. if periodic exchanges take place properly with all Modbus slaves. It is associated to bit 12 of
the gateway status word. Unlike the first LED, only one Modbus command per slave should receive a
response on a periodic basis for this LED to remain green.
• Hexadecimal display of gateway output data (%QW4.0 to %QW4.0.15) in the OUTPUTS frame. Ditto.
The green/red LED indicates whether the Profibus-DP master wants the gateway to communicate with the
Modbus slaves. It is associated to bit 13 (FB_DU) of the Profibus-DP master control word, which is updated
in the “Handshake_master” program, in accordance with the user controls described below.
See note (1).
•
User controls for enabling / disabling exchanges on the gateway Modbus sub-network. These two exclusive
buttons are meant to switch the value of bit 13 (FB_DU) of the Profibus-DP master control word and to
generate a new control meant for the gateway (see “Handshake_master” program description and
chapter 5.2.1 Profibus-DP Master Control Word, page 38).
See note (1).


