


Chapter 2 Hardware Installation and Service 2-11
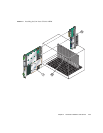
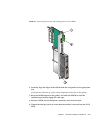
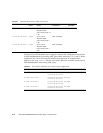
FIGURE 2-2 Injector/Ejector Latch and Locking Screw on the ARTM
6. Carefully align the edges of the ARTM with the card guides in the appropriate
slot.
Look into the enclosure to verify correct alignment of the rails in the guides.
7. Keep the ARTM aligned in the guides, and slide the ARTM in until the
injector/ejector latches engage the card cage.
8. Push the ARTM into the backplane connectors, and close the latch.
9. Tighten the locking screws to ensure that the module is secured into the ATCA
shelf.