


2-12 Sun Netra CP3220 Blade Server User’s Guide • January 2010
10. Install the Sun Netra CP3220 blade server into the front of the ATCA shelf in
the corresponding slot.
See Section 2.2.3.2, “Installing the Blade Server Into the Shelf” on page 2-12 for
instructions.
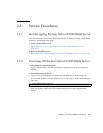
2.2.3.2 Installing the Blade Server Into the Shelf
Note – You can install the Sun Netra CP3220 blade server in any available slot in the
ATCA shelf except for slots 7 and 8.
1. If you have installed an ARTM, go to the front of the system and locate the
same slot number where you installed the ARTM.
2. Remove the filler panel from the blade server slot, if necessary.
The filler panel is secured to the card cage using two screws, one at the top of the
filler panel, the other at the bottom. Store the filler panel in a safe place; you
might need to use it again if you remove a blade server for an extended time.
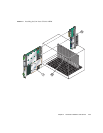
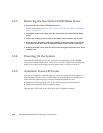
3. Prepare the Sun Netra CP3220 blade server by opening the injector/ejector
latches (
FIGURE 2-2).
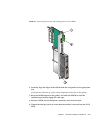
4. Carefully align the edges of the blade server with the guides in the appropriate
slot.
Look into the enclosure to verify correct alignment of the rails in the guides.
5. Keep the blade server aligned in the guides and slide the blade server in until
the injector/ejector latches engage the card cage.
6. Push the blade server slightly into the backplane connectors and close the
latches to seat the blade server in the connectors.
When the lower latch is closed, the blue Hot-Swap LED blinks while the blade
server is initializing. The blue LED turns off and the green OK LED lights when
the blade server is ready for use.
7. Tighten the locking screws and the top and the bottom of the Sun Netra CP3220
blade server to ensure that it is secured to the ATCA shelf (
FIGURE 2-2).
The blade server is now completely installed and will power on automatically.