


24
Health Care System IIIInstallation
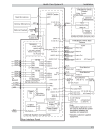
ISDN BRI Cables
Take the six ends of the ISDN BRI cables and verify that they are labelled ISDN 1, 2, 3, 4, 5 and 6.
Connect ISDN cable No. 1 to the first ISDN socket (S/T-interface) provided by the service provider. This will
be your main number. Connect ISDN cable No. 2 to the second ISDN socket, ISDN cable No. 3 to the third
ISDN socket, ISDN cable No. 4 to the fourth socket, ISDN cable No. 5 to the fifth socket and ISDN cable
No. 6 to the sixth socket.
North America: The HCS III does have built in network terminators as standard. If your wall socket provides you
with an ISDN S/T-interface, you will need to bypass network terminating units between your HCS III and the
ISDN lines, see Appendix 1.
WRITE DOWN THE NUMBERS ASSOCIATED WITH EACH OF THE ISDN LINES. YOU WILL NEED THEM LATER TO CONFIGURE THE SYSTEM.
NET 1 External Network Interface
To connect the HCS III system to a network using the NET 1 connector provided on the Codec, proceed as
follows:
Remove the rear interface panel that is fastened with four screws, to gain entry to the Codec.
Route the required RS366/V35 cables up from the bottom of the cart, through the cable entry hole, and plug
the connector into the NET connector on the Codec. Tighten the two screws to secure the connector. Use
cable ties to secure the cable to the cart, to prevent any tension on the cables.
Connect the other end of the cable to the customer supplied CSU/DSU.
Re-install the rear interface panel with the four screws.
PRI Interface
If you are using the E1/T1 interface, the E1/T1 Port 1 cable must be connected to a CSU unit, see Appendix 3.
The E1/T1 Port 2 Cable is used to fascilitate the operation of two or more codecs in the same environment,
using only one incoming T1 PRI line. Refer to Appendix 3 for cabling instructions.
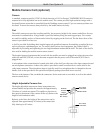
LAN Cable
Connect the LAN cable from the LAN port on the rear panel of the main HCS III cart, to a Local Area
Network. This LAN connection will allow H.323 type calls and control of the codec using a PC with
standard WWW-browser. See the section on Ethernet Functionality for futher instruction.
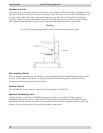
Mobile Camera Cart Cable
Connect the mobile camera cart cable to the MOBILE connector on the rear panel of the main HCS III cart,
and fasten the connector with the two thumb screws.
NOTE