


INTERFACES
4. Press the Test B button.
5. Press the Last Page button C until SERIAL appears.
4. Press the Select D button to select SERIAL.
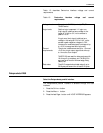
Set baud rate
Once SERIAL is selected, baud rate, parity and flow control can
be set.
With SERIAL appearing on the User Interface:
1. Press the Test B button.
2. Press the Last Page C button until BAUD RATE appears.
3. Press the Test B button.
4. Press the Last Page C button to scroll through the baud rate
options: 1,200, 2,400, 4,800, 9,600, 19,200. 9,600 is the
factory default.
5. Press the Select D button once your chosen baud rate
appears.
Set parity
With the baud rate appearing on the User Interface, follow these
steps:
1. Press the Menu A button.
2. Press the Last Page C button until PARITY appears.
3. Press the Test B button.
4. Press the Last Page C button to scroll through the parity
options: 7 BIT ODD, 7 BIT EVEN, 7 BIT MARK, 7 BIT SPACE,
8 BIT ODD, 8 BIT EVEN, 8 BIT NONE. 8 BIT NONE is the
factory default.
5. Press the Select D button to select parity.
Note: For LJ2D emulation, 8 data bit mode is required.
1-12 XEROX 4213 LASER PRINTER PROGRAMMER REFERENCE