


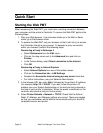

Web Print Manager Tool User Guide Page 17
• At the scanner, press the Mode button to select "Scan mode".
• For AccXES firmware 7.0 or greater, put in the Scan Directory
name.
• For AccXES firmware 9.0, pressing the Sample Mode button while
in the “Ready to Scan” screen, will bring up a menu to select “scan-
to-file”, “scan-to-print”, or both.
NOTE: If you disable both checkboxes, then you cannot exit the
screen until at least one box is checked.
• Select the Menu button and Configuration > Scan Options
(Color) > Format > JPEG or TIFF.
• The Image Quality area of the Scanner Control Panel allows you to
make corrective adjustments to the image and extract the best
possible copy quality from an original document. Select
Mixed/Custom if the document contains a mixture of photographic and
line images, color, or halftone images.
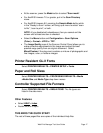
Printer Resident GL/2 Fonts
Select PRINTER DEFAULTS > PRINTER SETUP > Fonts.
Paper and Roll Sizes
Select PRINTER DEFAULTS > PROCESSING DEFAULTS > Media
>Media Size and Media Type drop down menus.
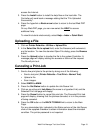
Controller Supported File Formats
Select PRINTER DEFAULTS > EMULATIONS. The file types are
listed in the side menu.
Other Features
• Select HELP > Index.
• Double click on a topic.
THIS ENDS THE QUICK START.
The rest of these pages/files are copies of the individual Help files.