


90 • Scanning to the Network (SCAN mode) XEROX WIDE FORMAT COPY SYSTEM
Clearing the scanned images
The C/CA key enables you to remove scanned images from the WIDE
FORMAT COPY SYSTEM hard disk.
To clear scanned images:
1. Press the
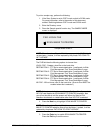
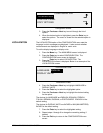
C/CA key. The CLEAR SCANNED IMAGE screen is
displayed.
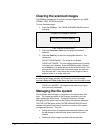
CLEAR SCANNED IMAGE
DO NOT CLEAR IMAGE
Clear Scanned Image Screen
2. Press the
Previous or Next key to highlight the desired
selection.
3. Press the
Enter key to select the highlighted selection. The
choices are:
DO NOT CLEAR IMAGE – The image is not deleted.
CLEAR LAST IMAGE - The last image scanned by the currently
active account is deleted. Press the
C/CA key again, followed
by the
Enter key, to delete the next-to-last scanned image. This
process can be repeated until all desired images are removed
from the hard disk. It may take a few minutes longer to clear a
scanned photo or an image with color.
NOTE: It is not possible to skip images. For example, it is not possible
to leave the last image scanned, but delete the next-to-last image
scanned. Photo and Color mode scans may take a few minutes to clear.
CLEAR ALL IMAGES – All images stored under the currently
active account are deleted.
Managing the file system
The file system stores images in directories on the internal hard disk
drive. The images are stored in the Directory specified by the user
when entering the SCAN mode. The default directory is “images”.
Managing the file system requires the System Administrator password.
The FILE SYSTEM option of the SYSTEM ADMINISTRATION menu
enables the System Administrator to perform a number of file system
management functions. They are:
• Listing the number of images stored under each directory and
the percentage of total hard disk space consumed by each
account
• Deleting all of the images scanned under any directory.