


XEROX WIDE FORMAT COPY SYSTEM Special features keys • 83
To print a sample copy, perform the following:
1. If the Scan System is set to COPY mode, switch to SCAN mode.
For more information, refer to the section of this document
entitled “
Switching between COPY mode and SCAN mode”.
2. Enter the Directory name.
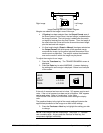
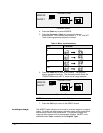
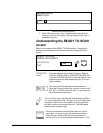
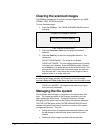
3. Press the Sample special function key. The SAMPLE MODE
screen is displayed.
SAMPLE MODE
FILE: LOCAL FILE
SCAN IMAGE TO PRINTER
9
Sample Mode Screen 2
NOTE: When there is no Scan-to-Print license present, the FILE field will
not be shown. Instead, it will be replaced by the phrase "NO SCAN-TO-
NET LICENSE".
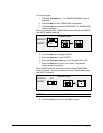
The FILE field has the following options to choose from:
LOCAL FILE - Creates a local file on the hard drive.
DESTINATION 1 - FTP file to remote destination 1 configured via Web
Print Management Tool "Scan Destinations" page.
DESTINATION 2 - FTP file to remote destination 2 configured via Web
Print Management Tool "Scan Destinations" page.
DESTINATION 3 - FTP file to remote destination 1 configured via Web
Print Management Tool "Scan Destinations" page.
DESTINATION 4 - FTP file to remote destination 1 configured via Web
Print Management Tool "Scan Destinations" page.
NO FILE - Will not leave a file on the hard drive. (Scan-to-Print MUST be
enabled when this is selected.)
NOTE: At least one destination must be specified for a file. If you select
NO FILE and disable the SCAN IMAGE TO PRINTER checkbox, then
you will not be able to exit the screen until either the Scan-to-Print
checkbox is selected, or a destination other than NO FILE is selected.
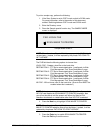
4. Press the Next key to highlight SCAN IMAGE TO PRINTER.
NOTE: When there is no Scan-to-Print license present, the SCAN
IMAGE TO PRINTER selection field will not be shown. Instead, it will be
replaced by the phrase "NO SCAN-TO-PRINT LICENSE".
5. Press the Enter key to enable SCAN IMAGE TO PRINTER.
Press the
Exit key to exit the menu.