


Scanning and Faxing
WorkCentre 7425/7428/7435
System Administrator Guide
106
5. Setting S/MIME Security (optional).
a. From the Connectivity & Network Setup list, select Security Settings. If the selection is not
visible, use the scrolling arrow to display it.
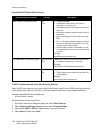
b. Select S/MIME Settings and set the following items.
• Device Certificate – S/MIME: Link a certificate to the printer. You must have an S/MIME
certificate on the printer to perform encryption. For information on S/MIME certificates, see
Configuring S/MIME certificates with CentreWare Internet Services on page 78.
• S/MIME Communication: Set whether to enable or disable S/MIME Communication when a
certificate ID is set.
• Receive Untrusted E-mail: Set whether to receive untrusted E-mail or not.
• Receive Untrusted iFAX : Set whether to receive untrusted iFAX or not.
• Message Digest Algorithm: Select a message digest algorithm from SHA1 or MD5.
• Message Encryption Method: Select a contents encryption method from 3DES, RC2-40, RC2-
64, or RC2-128.
• Digital Signature – Outgoing E-mail: Set whether to always attach a digital signature to E-
mail or to select a digital signature when sending E-mail.
• Digital Signature – Outgoing iFAX: Set whether to always attach a digital signature to iFAX or
to select a digital signature when sending iFAX.
• Signing Certificate for Email Attachment: Device Certificate allows you to determine which
certific ate is to be used to sign Email attachment. Smart Card Certificate is only effective when
Always add signature is selected for Digital Signature – Outgoing Email.
• Certificate Auto Store: Select whether or not to automatically store a S/MIME certificate
attached with the E-mail when receiving E-mail sent from an address registered in the address
book.
6. Select Close repeatedly until the Tools screen is displayed.
7. Wait several seconds for the Auto Clear service to log you out.
8. After the printer is restarted, print a Configuration Report to confirm that each item is configured.
For information on how to print a Configuration Report, see Configuration Report on page 22.
9. Test the E-mail transmission from the printer by pressing the Services button, then touching the on-
screen E-mail button, then the New Recipient button. Type in your E-mail address, then press Close.
Place a document in the document feeder and press the green Start button on the control panel.
Note: To set up the address book for use with LDAP (network search), see LDAP Authentication on
page 66.
LDAP Server Configuration
1. Open your Web browser and enter the IP address of the printer in the address field. Press Enter to
open CentreWare Internet Services.
2. Click the Properties tab.
3. Click the Connectivity folder, then the Protocols folder, then the LDAP folder.
4. Click LDAP Server, and under Server Information, enter the IP address (or host name) in the box
Note: If entering the LDAP address by host name, make sure to use the fully qualified domain name of
the LDAP server (for example, ldapserver.mycompany.com)