


Chapter 38 Anti-Spam
ZyWALL USG 1000 User’s Guide
658
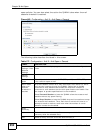
38.4.2 Regular Expressions in Black or White List Entries
The following applies for a black or white list entry based on an e-mail subject, e-
mail address, or e-mail header value.
• Use a question mark (?) to let a single character vary. For example, use “a?c”
(without the quotation marks) to specify abc, acc and so on.
• You can also use a wildcard (*). For example, if you configure *def.com, any e-
mail address that ends in def.com matches. So “mail.def.com” matches.
• The wildcard can be anywhere in the text string and you can use more than one
wildcard. You cannot use two wildcards side by side, there must be other
characters between them.
• The ZyWALL checks the first header with the name you specified in the entry. So
if the e-mail has more than one “Received” header, the ZyWALL checks the first
one.
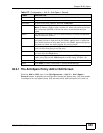
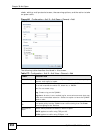
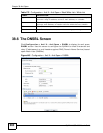
Sender or Mail
Relay IP
Address
This field displays when you select the IP type. Enter an IP address in
dotted decimal notation.
Netmask This field displays when you select the IP type. Enter the subnet mask
here, if applicable.
Sender E-Mail
Address
This field displays when you select the E-Mail type. Enter a keyword (up
to 63 ASCII characters). See Section 38.4.2 on page 658 for more
details.
Mail Header
Field Name
This field displays when you select the Mail Header type.
Type the name part of an e-mail header (the part that comes before the
colon). Use up to 63 ASCII characters.
For example, if you want the entry to check the “Received:” header for a
specific mail server’s domain, enter “Received” here.
Field Value
Keyword
This field displays when you select the Mail Header type.
Type the value part of an e-mail header (the part that comes after the
colon). Use up to 63 ASCII characters.
For example, if you want the entry to check the “Received:” header for a
specific mail server’s domain, enter the mail server’s domain here.
See Section 38.4.2 on page 658 for more details.
OK Click OK to save your changes.
Cancel Click Cancel to exit this screen without saving your changes.
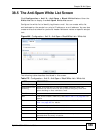
Table 175 Configuration > Anti-X > Anti-Spam > Black/White List > Black List (or
White List) > Add
LABEL DESCRIPTION