


ES-2024 Series User’s Guide
Chapter 7 Basic Setting 70
7.4 Introduction to VLANs
A VLAN (Virtual Local Area Network) allows a physical network to be partitioned into
multiple logical networks. Devices on a logical network belong to one group. A device can
belong to more than one group. With VLAN, a device cannot directly talk to or hear from
devices that are not in the same group(s); the traffic must first go through a router.
In MTU (Multi-Tenant Unit) applications, VLAN is vital in providing isolation and security
among the subscribers. When properly configured, VLAN prevents one subscriber from
accessing the network resources of another on the same LAN, thus a user will not see the
printers and hard disks of another user in the same building.
VLAN also increases network performance by limiting broadcasts to a smaller and more
manageable logical broadcast domain. In traditional switched environments, all broadcast
packets go to each and every individual port. With VLAN, all broadcasts are confined to a
specific broadcast domain.
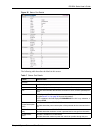
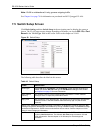
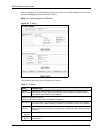
Use Time Server
when Bootup
Enter the time service protocol that a timeserver sends when you turn on the switch.
Not all time servers support all protocols, so you may have to use trial and error to
find a protocol that works. The main differences between them are the time format.
When you select the Daytime (RFC 867) format, the switch displays the day,
month, year and time with no time zone adjustment. When you use this format it is
recommended that you use a Daytime timeserver within your geographical time
zone.
Time (RFC-868) format displays a 4-byte integer giving the total number of seconds
since 1970/1/1 at 0:0:0.
NTP (RFC-1305) is similar to Time (RFC-868).
None is the default value. Enter the time manually. Each time you turn on the
switch, the time and date will be reset to 2000-1-1 0:0.
Time Server IP
Address
Enter the IP address of your timeserver. The switch searches for the timeserver for
up to 60 seconds. If you select a timeserver that is unreachable, then this screen
will appear locked for 60 seconds. Please wait.
Current Time This field displays the time you open this menu (or refresh the menu).
New Time
(hh:min:ss)
Enter the new time in hour, minute and second format. The new time then appears
in the Current Time field after you click Apply.
Current Date This field displays the date you open this menu.
New Date (yyyy-
mm-dd)
Enter the new date in year, month and day format. The new date then appears in
the Current Date field after you click Apply.
Time Zone Select the time difference between UTC (Universal Time Coordinated, formerly
known as GMT, Greenwich Mean Time) and your time zone from the drop-down list
box.
Apply Click Apply to save your changes to the switch’s run-time memory. The switch
loses these changes if it is turned off or loses power, so use the Save link on the top
navigation panel to save your changes to the non-volatile memory when you are
done configuring.
Cancel Click Cancel to reset the fields to your previous configuration.
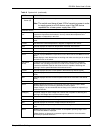
Table 9 General Setup (continued)
LABEL DESCRIPTION