


Chapter 29 IDP
ZyWALL USG 100/200 Series User’s Guide
501
The following table describes the fields in this screen.
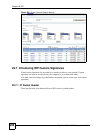
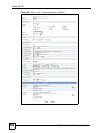
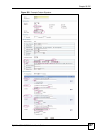
29.8.1 Creating or Editing a Custom Signature
Click the Add icon to create a new signature or click the Edit icon to edit an existing signature
in the screen as shown in Figure 388 on page 500.
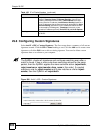
A packet must match all items you configure in this screen before it matches the signature. The
more specific your signature (including packet contents), then the fewer false positives the
signature will trigger.
Try to write signatures that target a vulnerability, for example a certain type of traffic on
certain operating systems, instead of a specific exploit.
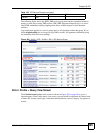
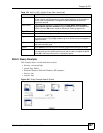
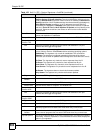
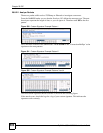
Table 161 Anti-X > IDP > Custom Signatures
LABEL DESCRIPTION
Creating Use this part of the screen to create, edit, delete or export (save to your computer)
custom signatures.
SID SID is the signature ID that uniquely identifies a signature. Click the SID header to sort
signatures in ascending or descending order. It is automatically created when you
click the Add icon to create a new signature. You can edit the ID, but it cannot already
exist and it must be in the 9000000 to 9999999 range.
Name This is the name of your custom signature. Duplicate names can exist, but it is
advisable to use unique signature names that give some hint as to intent of the
signature and the type of attack it is supposed to prevent.
Add/Edit Click the Add icon to create a new signature or click the Edit icon to edit an existing
signature.
Delete Use this column to delete signatures. Select (or clear) the check box in the header
column to select (or clear) all check boxes in that column. You can also select (or
clear) individual signatures within the column. When you are certain that you have
only selected signatures that you want to remove, click the Delete icon. Click OK in
the confirm delete signature dialog box to delete the selected signature(s).
Export Use this column to save signatures to your computer. Select (or clear) the check box
in the header column to select (or clear) all check boxes in that column. You can also
select (or clear) individual signatures within the column. When you are certain that you
have only selected signatures that you want to save, click Export. Click Save in the
file download dialog box and then select a location and name for the file.
Custom signatures must end with the ‘rules’ file name extension, for example,
MySig.rules.
Importing Use this part of the screen to import custom signatures (previously saved to your
computer) to the ZyWALL.
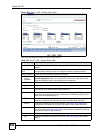
Note: The name of the complete custom signature file on the ZyWALL
is ‘custom.rules’. If you import a file named ‘custom.rules’, then
all custom signatures on the ZyWALL are overwritten with the
new file. If this is not your intention, make sure that the files you
import are not named ‘custom.rules’.
File Path Type the file path and name of the custom signature file you want to import in the text
box (or click Browse to find it on your computer) and then click Import to transfer the
file to the ZyWALL.
New signatures then display in the ZyWALL IDP > Custom Signatures screen.