


ADCP-96-015 • Issue 1 • July 2004
Page 12
© 2004, ADC Telecommunications, Inc.
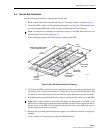
2. If a ground spacer (accessory) will not be installed, proceed to step 7. If a ground spacer
will be installed, align the ends of the left ground spacer section with the ends of the right
ground spacer section and then press the two sections together.
3. Place the assembled ground spacer in position for mounting on the adapter cover.
4. Align the mounting holes in the ground spacer with the mounting holes in the adapter
cover.
5. Secure the ground spacer to the adapter cover using the four capscrews, four lock washers,
and four flat washers provided with the cabinet. Tighten all capscrews securely.
6. Open the rear door of the cabinet and remove the back section of the cabinet bottom cover
as described in Section 5.1. Then return to step 7 of this procedure to finish mounting the
cabinet.
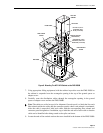
7. Using appropriate lifting equipment, hold the cabinet in position for mounting onto the
ground spacer or adapter cover.
8. Lower the cabinet onto the ground spacer or adapter cover and align the mounting holes in
the bottom of the cabinet with the holes in the spacer or cover.
9. If the installation includes a ground spacer, secure the cabinet to the spacer using the four
hex bolts, four flat washers and four nuts provided with the spacer. If the installation does
not include a ground spacer, secure the cabinet to the adapter cover using the four hex
bolts, lock flat washers, and four flat washers provided with the cabinet. Tighten all
fasteners securely.
10. If the FMS will be used as a splicing vault for the OSP feeder and distribution cables,
install the required splice enclosure.
11. Install the FMS sleeve cover onto the FMS and secure using the two capscrews and
washers provided with the cover. Tighten both capscrews securely.
3.7.2 Mounting The ACE-142V Cabinet on the FMS-20000
Use the following procedure to mount the ACE-142V cabinet on the FMS-20000:
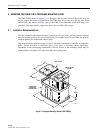
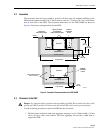
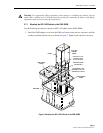
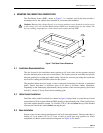
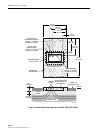
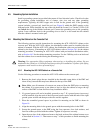
1. Mount the FMS adapter cover on the FMS and secure using the two capscrews and flat
washers provided with the cover as shown in Figure 6. Tighten each capscrew securely.
2. If a ground spacer (accessory) will not be installed, proceed to step 7. If a ground spacer
will be installed, align the ends of the left ground spacer section with the ends of the right
ground spacer section and then press the two sections together.
3. Place the assembled ground spacer in position for mounting on the adapter cover.
4. Align the mounting holes in the ground spacer with the mounting holes in the adapter
cover.
5. Secure the ground spacer to the adapter cover using the four capscrews, four lock washers,
and four flat washers provided with the cabinet. Tighten all capscrews securely.
6. Open the rear door of the cabinet and remove the back section of the cabinet bottom cover
as described in Section 5.1. Then return to step 7 of this procedure to finish mounting the
cabinet.