


Chapter 1. Introduction
5
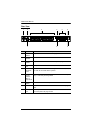
(Continued from previous page.)
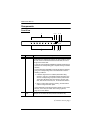
No. Item Description
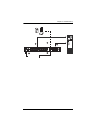
3 Station ID
LED
The PN9108's Station ID usually displays here. If this is a Single
Station installation (see page 10), or the First Station on a Daisy
Chained installation (see page 12), the PN9108 has a Station ID
of 01.
The current status (in amps) displays here (instead of the
Station ID) when the Current Display Switch is toggled ON (see
item 7, below).
4 10/100
Mbps Data
LED
The LED lights ORANGE to indicate 10 Mbps data transmission
speed.
The LED lights GREEN to indicate 100 Mbps data transmission
speed.
5 Power LED Lights when the PN9108 is powered up and ready to operate.
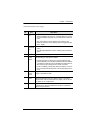
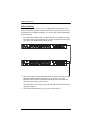
6 Power
Control
Buttons
Each button (A to H), controls the power status of its
corresponding AC output port as follows:
Pressing the button for less than 3 seconds toggles the port
between Remote Access enabled and Remote Access disabled
(Local Mode). If Remote Access is disabled, the switch does not
allow the port to be managed from a remote connection.
Under Local Mode, pressing and holding the button in for more
than 3 seconds switches the power to its corresponding port On
or Off.
7 Current
Display
Switch
Toggles between showing the Station ID and current status (in
amps) on the Station ID LED.
8 Reset
Switch
Pressing and holding this switch in for more that three seconds
resets the PN9108 to its factory default settings. This switch is
recessed and must be pushed with a thin object, such as the end
of a paper clip, or a ballpoint pen.
9 Link LED Lights GREEN to indicate that a connection via the PN9108's RJ-
45 Ethernet port has been established. Flashes to indicate that
data is being transmitted.