


724-746-5500 | blackbox.com
Page 16
724-746-5500 | blackbox.com
Chapter 3: Installation
3. Installation
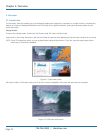
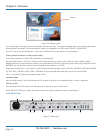
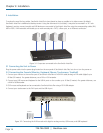
To reduce the need for long cables, ServSwitch 4site Flex is best placed as close as possible to its video sources. By default,
ServSwitch 4site Flex is delivered as desktop version. Using the rackmount kit (included), it may also be mounted in a 19” rack.
Keyboard, monitor, mouse (console) and USB devices are connected to ServSwitch 4site Flex using the corresponding cables (DVI,
USB or PS/2). KVM extenders will enable you to work remotely via a CAT5, a fiber optic, or an Ethernet connection.
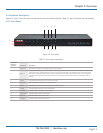
Figure 3-1. Computers connected to the ServSwitch 4site Flex.
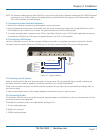
3.1 Connecting the Unit to Power
Plug the power cable into the power plug located on the rear panel of ServSwitch 4site Flex, but do not turn the power on.
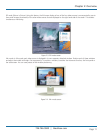
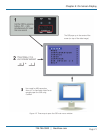
3.2 Connecting the Console (Monitor, Keyboard, Mouse, Touchscreen, Trackball)
1. Connect your monitor to the monitor port of ServSwitch 4site Flex via VGA-DVI cable (analog) or DVI cable (digital) up to
64 feet (20 meters). For greater distances, use a DVI or VGA extender.
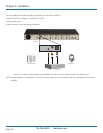
2. Connect your USB mouse and keyboard to the USB-A ports on the console up to 16 feet (5 meters). For greater distances, use
a KVM or USB extender.
3. PS/2 mouse and keyboard can be connected to ServSwitch 4site Flex using a PS/2-USB adapter.
4. Connect your touchscreen to the DVI-I port and the USB-A port.
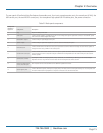
Figure 3-2. Connecting the KVM console with digital or analog monitor, USB mouse, and USB keyboard.
Speakers