


12. Replace the computer cover (see Replacing the Computer Cover).
Installing the Processor
1. Follow the procedures in Before You Begin.
2. Remove the computer cover (see Removing the Computer Cover).
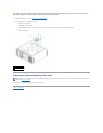
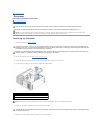
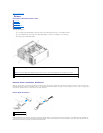
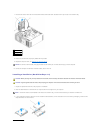
3. Loosen the captive thumbscrews that secure the memory shroud and lift it away from the computer.
4. If you are replacing a processor, remove the processor (see Removing the Processor).
5. Unpack the new processor, being careful not to touch the underside of the processor.
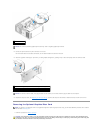
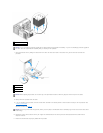
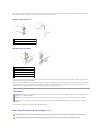
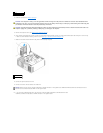
6. Open the processor cover by sliding the release lever from under the center cover latch on the socket. Ensure that the release lever is fully extended.
NOTICE: Ground yourself by touching an unpainted metal surface on the back of the computer.
NOTICE: When replacing the processor, do not touch any of the pins inside the socket or allow any objects to fall on the pins in the socket.
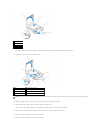
CAUTION: Your computer is heavy (it has an approximate minimum weight of 55 lbs) and can be difficult to maneuver. Seek assistance before
attempting to lift, move, or tilt it; this computer requires a two-man lift. Always lift correctly to avoid injury; avoid bending over while lifting. See
your Product Information Guide for other important safety information.
CAUTION: The computer stand should be installed at all times to ensure maximum system stability. Failure to install the stand could result in the
computer tipping over, potentially resulting in bodily injury or damage to the computer.
1
memory shroud
2
thumbscrews (2)
3
memory fan (only present on systems without memory riser cards)
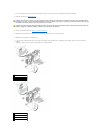
NOTICE: You must position the processor correctly in the socket to avoid permanent damage to the processor and the computer when you turn on the
computer.